If you are looking for a fun birthday Minecraft cake for a gamer, this chocolate Minecraft cake recipe is one of the best options to make at home. It combines rich chocolate cake with a block-style design inspired by the Minecraft world: brown dirt blocks, green grass tops, pixel decorations, and familiar details like a sword, TNT, a creeper, and cube-style characters.
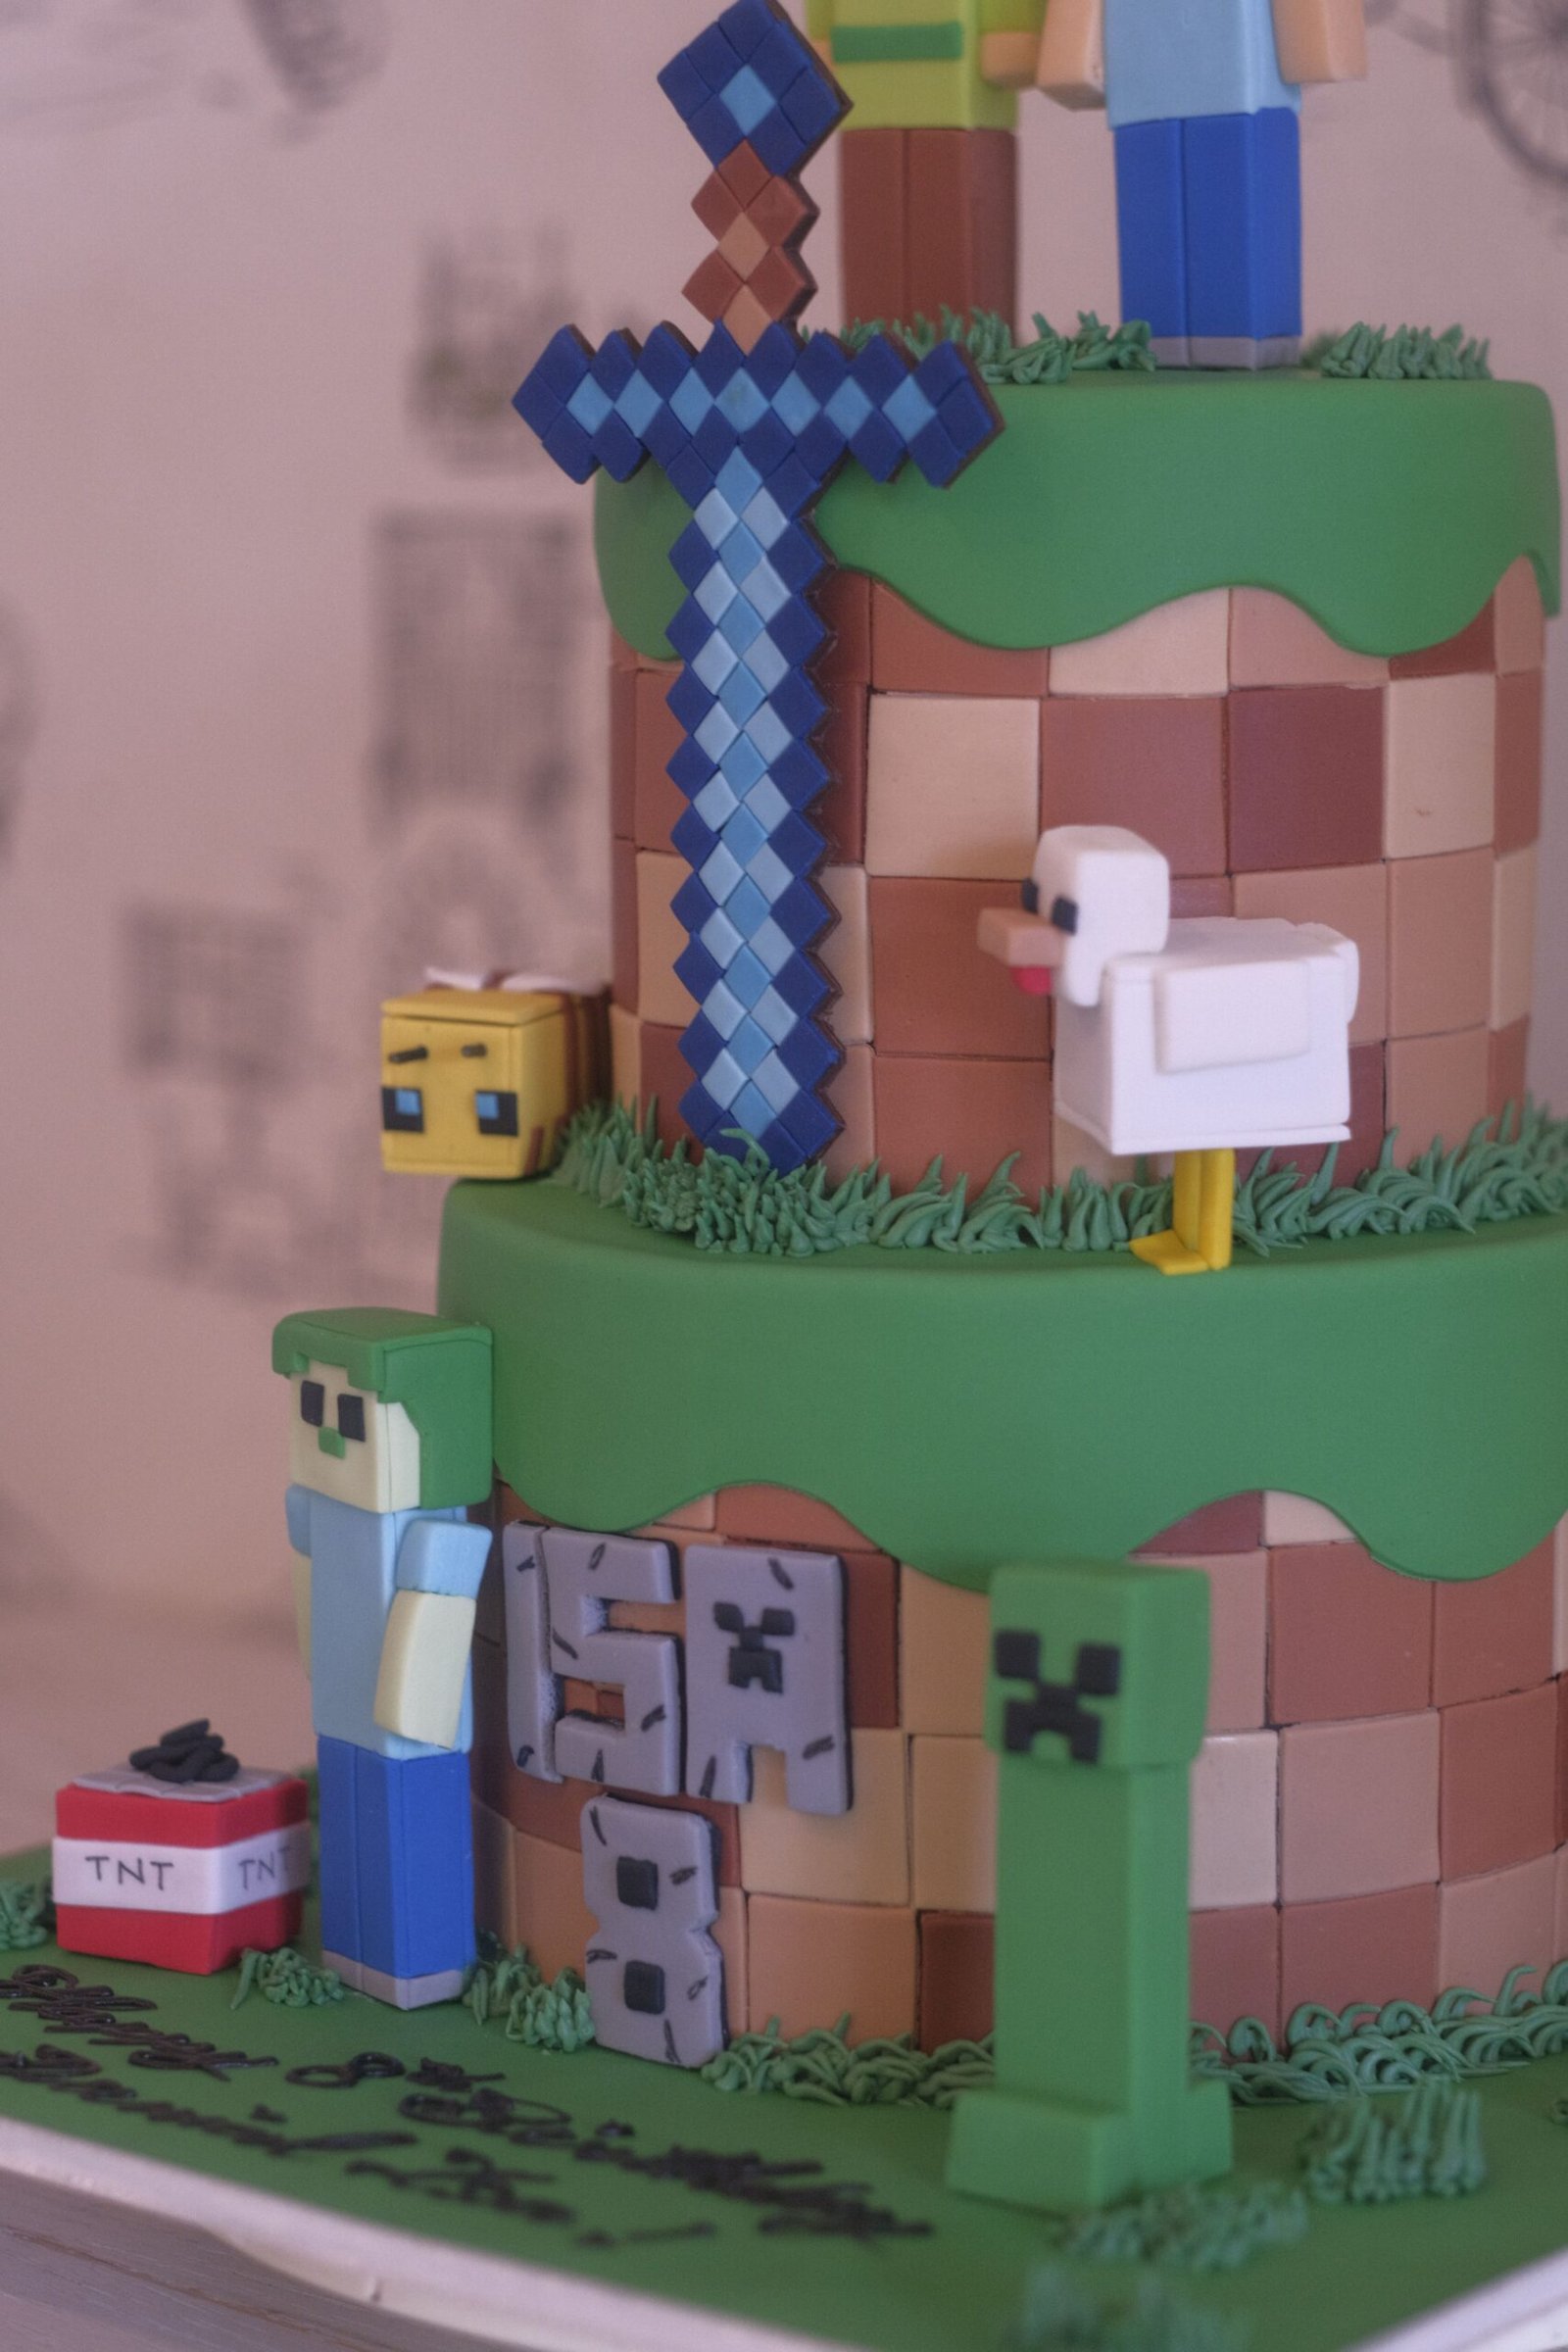
The cake in the image is a two-tier chocolate celebration cake with a strong Minecraft-style look. The sides are decorated in pixel squares to resemble dirt blocks, while the tops are finished in green to look like grassy terrain. Around the cake are playful fondant details that make it feel like a small edible game scene instead of a plain birthday cake.
What makes this cake a great choice is that the design looks impressive, but it is actually very achievable. Minecraft-style cakes are easier to decorate than many other themed cakes because the look is based on simple squares, cubes, and block shapes rather than delicate piping or realistic sculpting. If you can bake a layered cake and cut fondant into small squares, you can create a cake that feels detailed and special.
Why This Cake Works So Well
This cake is popular for birthday parties because it looks custom-made and theme-specific without requiring extremely advanced decorating skills. Minecraft’s visual style does a lot of the hard work for you. The pixel look is meant to be blocky, so perfection is not necessary. In fact, slightly uneven squares can still look completely right for the design.
This cake works especially well because it is:
Rich and chocolatey, which suits the brown dirt-block look
Easy to theme for kids, teens, and gamers
Flexible as a one-tier or two-tier cake
Simple to decorate with blocky fondant shapes
Easy to customize with names, ages, and favorite game elements
Great for birthday dessert tables and party photos
It is also a very practical design for home bakers because you can make it as detailed or as simple as you want. You can go all out with fondant figures and pixel tools, or keep it easy with a green top, brown square sides, and one or two themed toppers.
What the Cake Is Inspired By
The cake in the image is a two-tier Minecraft-inspired chocolate cake decorated to look like stacked game terrain. The main structure uses two round tiers, but the decoration makes them look like blocks from the Minecraft world. The brown sides mimic dirt blocks, and the green tops resemble grassy land.
The decorative details include:
A pixel-style blue sword
Block-style player character figures
A green creeper
A white sheep
A TNT block
Green piped grass
Pixel block lettering or number details
Minecraft-style terrain textures
Together, those details turn a basic chocolate cake into a themed centerpiece.
Ingredients
For the Chocolate Cake
3 cups all-purpose flour
2 3/4 cups granulated sugar
1 cup unsweetened cocoa powder
2 teaspoons baking powder
1 1/2 teaspoons baking soda
1 teaspoon salt
1 cup buttermilk, room temperature
3/4 cup vegetable oil
4 large eggs, room temperature
2 teaspoons vanilla extract
1 cup sour cream
1 cup hot coffee or hot water
For the Chocolate Buttercream
1 1/2 cups unsalted butter, softened
5 cups powdered sugar
1 cup unsweetened cocoa powder
1/2 cup heavy cream or whole milk
2 teaspoons vanilla extract
1/2 teaspoon salt
150 grams melted dark chocolate, cooled slightly
For the Green Grass Frosting
1 cup unsalted butter, softened
3 cups powdered sugar
2 to 3 tablespoons milk or cream
1 teaspoon vanilla extract
Pinch of salt
Green gel food coloring
For Decorating
Brown fondant
Tan fondant
Light brown fondant
Green fondant
Black fondant
White fondant
Blue fondant
Light blue fondant
Red fondant
Gray fondant
Yellow fondant
Edible glue or water
Chocolate cookie crumbs or chocolate sprinkles, optional
Cake dowels or bubble tea straws
Cake board
Grass piping tip
Equipment You Will Need
Two 8-inch cake pans
Two 6-inch cake pans
Mixing bowls
Electric mixer or stand mixer
Spatula
Offset spatula
Rolling pin
Sharp knife or pizza cutter
Piping bags
Grass piping tip
Cake board
Serrated knife
Dowels or sturdy straws
If you want a simpler version, you can make a one-tier 8-inch cake and skip the second tier.
Ingredient Notes
Cocoa powder: Use good-quality cocoa powder for a richer chocolate flavor. Because this is a themed cake, the appearance matters, but the flavor still needs to be excellent.
Hot coffee or hot water: Coffee deepens the chocolate taste without making the cake taste like coffee. If you prefer, hot water works too.
Sour cream: This helps keep the cake moist and tender, which is important for a decorated celebration cake.
Chocolate buttercream: This works best as the filling and crumb coat because it pairs naturally with the dirt-block theme.
Fondant: Fondant gives the cleanest pixel-block effect. It is the easiest way to create the Minecraft-style pattern on the sides.
How to Make the Chocolate Cake
Step 1: Prepare the Pans
Preheat your oven to 350°F (175°C). Grease and line two 8-inch cake pans and two 6-inch cake pans with parchment paper.
If you only have one set of pans, bake in batches.
Step 2: Mix the Dry Ingredients
In a large bowl, whisk together the flour, sugar, cocoa powder, baking powder, baking soda, and salt.
Make sure the cocoa powder is evenly mixed so the batter is smooth and free from dry lumps.
Step 3: Mix the Wet Ingredients
In a second bowl, whisk together the buttermilk, vegetable oil, eggs, vanilla extract, and sour cream until smooth.
Step 4: Combine the Batter
Add the wet ingredients to the dry ingredients and mix until just combined.
Slowly pour in the hot coffee or hot water and mix again. The batter will be thinner than many cake batters, which is normal. This helps create a soft, moist chocolate cake.
Step 5: Bake
Divide the batter between the prepared pans.
Bake the 6-inch cakes for about 25 to 30 minutes. Bake the 8-inch cakes for about 30 to 36 minutes. Baking times may vary slightly depending on your oven, so start checking near the lower end of the range.
The cakes are ready when a toothpick inserted into the center comes out clean or with a few moist crumbs.
Let the cakes cool in their pans for 10 minutes, then transfer to a wire rack to cool completely.
Step 6: Level the Cakes
Once the cakes are fully cooled, level the tops with a serrated knife if needed. Flat layers are important for a neat stacked cake.
How to Make the Chocolate Buttercream
Beat the softened butter until smooth and creamy.
Add the powdered sugar and cocoa powder gradually, mixing on low speed first so the sugar does not fly out of the bowl.
Add the vanilla extract, salt, and heavy cream or milk. Beat until smooth.
Pour in the melted dark chocolate and beat again until fluffy and rich.
If the buttercream feels too thick, add a little more cream. If it feels too soft, add a little more powdered sugar.
How to Make the Green Grass Frosting
Beat the butter until smooth.
Add powdered sugar, vanilla, salt, and enough milk or cream to create a soft but pipeable frosting.
Color it with green gel food coloring. You want a bright grassy green, not a dark forest green. A tiny touch of yellow can help create a more natural grassy shade.
Transfer the frosting to a piping bag fitted with a grass tip.
How to Assemble the Two Tiers
Assemble the Bottom Tier
Place one 8-inch cake layer on your cake board. Spread a layer of chocolate buttercream over the top.
Add the second 8-inch layer and press gently.
Apply a thin crumb coat over the entire cake. Chill for 20 to 30 minutes.
Assemble the Top Tier
Repeat the same process with the two 6-inch cake layers: fill, stack, crumb coat, and chill.
Add Support
Insert cake dowels or bubble tea straws into the center area of the bottom tier, trimming them so they sit level with the top of the cake.
Place the 6-inch cake on its own small cake board, then carefully set it on top of the bottom tier.
This step is important because the top tier needs support.
How to Create the Minecraft Dirt Block Sides
This is the key design step.
Roll out the brown, tan, and light brown fondant. Cut it into small squares, about 1 inch each. You do not need every square to be identical. Slight variation actually helps the design feel more natural and pixel-like.
Press the fondant squares onto the sides of both cake tiers over the crumb-coated surface. Mix the shades randomly so the sides resemble Minecraft dirt blocks rather than one flat brown color.
The brown and tan combination is what gives the cake its signature Minecraft terrain look.
For a stronger effect, keep the arrangement irregular. Too much symmetry can make the cake look less realistic.
How to Make the Grass Tops
The top of each tier should look like grassy terrain.
You can do this in two ways:
Option 1: Green Fondant Base + Piped Grass
Cover the top with a circle of green fondant, then pipe short tufts of green frosting around the edges and between decorations.
Option 2: All Buttercream Grass
Spread a thin layer of green buttercream over the top, then use the grass piping tip to pipe short grass-like strands across the edges.
The image shows grass details around the top edges and base, so piping grass helps make the cake feel fuller and more game-like.
How to Make the Decorations
Pixel Sword
Use blue and light blue fondant to create a block-style sword shape. You can cut small connected square sections and attach them together, or cut one full pixelated shape and add lighter blue pieces on top for detail.
If the sword is tall, let it dry slightly before placing it on the cake. You can also support it with a skewer.
Creeper
Shape a creeper from green fondant using a rectangular body and cube head. Add black square details for the eyes and face.
Because the Minecraft style is blocky, this is much easier than sculpting a realistic figure.
Sheep
Make the sheep from white fondant with a cube body and head. Use black or gray fondant for simple facial details and small legs.
TNT Block
Create a small red fondant cube and wrap a white strip around the middle. Add “TNT” using black fondant or an edible marker.
Player Figure
Make a simple block-style character using beige fondant for skin, blue for pants, light blue for the shirt, and brown for the hair.
Keep everything square and geometric.
Name or Age Detail
You can personalize the cake with a name plaque, a block-style age number, or a short message.
A blocky number design works especially well with this theme.
How to Make the Cake Look Closest to the Image
If your goal is to match the picture as closely as possible, focus on the following elements first:
Two stacked tiers
Brown pixel squares around the sides
Green grassy tops
A large blue sword on the upper section
A creeper and sheep on the lower area
A small TNT block
Piped grass details around the tiers
A few blocky character decorations
Those features matter more than copying every detail exactly.
The best results come from keeping the design clean and readable. Too many extra colors or decorations can make the cake look cluttered. Minecraft cakes look strongest when the palette stays mostly green, brown, blue, white, gray, red, and black.
Easier Version for Home Bakers
If you want the same overall theme with less work, make a single-tier cake.
Bake two 8-inch cake layers. Fill and frost them with chocolate buttercream. Add brown fondant squares around the sides, green frosting on top, and pipe a little grass around the edges.
Then add just three or four decorations, such as:
One pixel sword
One creeper
One TNT block
A birthday number or name
This simpler version still looks very Minecraft-inspired without the time commitment of a full two-tier cake.
No-Fondant Alternative
If you do not want to use fondant, you can still make a Minecraft-style cake.
Use chocolate buttercream on the sides and press small square decorations into it. You can use cut brownie pieces, chocolate bar pieces, wafer squares, or even fudge cubes to mimic the pixel look.
Use green buttercream on top for grass, then decorate with printable toppers or clean toy figures.
This version is less polished, but it is easier and often preferred by people who do not like fondant.
Make-Ahead Tips
You can bake the cake layers 1 to 2 days ahead. Wrap them tightly and refrigerate.
Buttercream can be made 2 to 3 days ahead. Store it in the fridge and re-whip before using.
Fondant decorations can be made several days in advance. Keep them at room temperature in a dry place.
If needed, assemble the full cake the day before serving. Keep it chilled or in a cool room.
Storage Tips
Store leftover cake in an airtight container in the refrigerator for up to 4 days.
Before serving, let slices sit at room temperature for about 20 to 30 minutes so the cake softens and tastes better.
If the cake is fully decorated with fondant, keep it in a cake box if possible. That helps protect the decorations from moisture.
Common Mistakes to Avoid
Not using support for the top tier
A stacked cake needs dowels or strong straws in the bottom tier. Without support, the cake can sink.
Making the fondant squares too large
Smaller squares look more like Minecraft blocks. Very large ones can lose the pixel effect.
Using only one shade of brown
The dirt block look works better when you use several shades of brown and tan.
Skipping the chill time
Chilling each tier before decorating helps keep the shape clean and makes the fondant easier to place.
Overloading the top
Leave enough space around the decorations so the cake still looks neat and readable.
Frequently Asked Questions
Can I make this cake with a different flavor?
Yes. Vanilla, funfetti, cookies and cream, or chocolate chip cake all work. Chocolate is especially good because it matches the dirt-block theme visually.
Can I make this as cupcakes?
Yes. Chocolate cupcakes with green grass frosting and small Minecraft-inspired toppers work very well for parties.
Do I need fondant to make a Minecraft cake?
No. Fondant gives the cleanest block design, but you can also use buttercream, brownies, candy, or printed toppers.
Is this cake suitable for beginners?
A one-tier version is very beginner-friendly. A two-tier version takes more time and planning but is still manageable because the decorating style is based on simple squares.
Can I use toy figures instead of making fondant characters?
Yes. Many home bakers do this to save time. Just make sure the figures are clean and placed on a food-safe surface.
How far ahead can I decorate the cake?
You can decorate it the day before serving. In many cases, that actually makes the day of the party easier.
Recipe Card
Chocolate Minecraft Cake
Prep Time: 1 hour
Bake Time: 30 to 36 minutes
Decorating Time: 2 to 3 hours
Total Time: About 4 1/2 to 5 1/2 hours
Servings: 20 to 28 slices
Category: Dessert
Method: Baking
Cuisine: Birthday Cake / Party Cake
Ingredients
Chocolate Cake
3 cups all-purpose flour
2 3/4 cups granulated sugar
1 cup unsweetened cocoa powder
2 teaspoons baking powder
1 1/2 teaspoons baking soda
1 teaspoon salt
1 cup buttermilk
3/4 cup vegetable oil
4 eggs
2 teaspoons vanilla extract
1 cup sour cream
1 cup hot coffee or hot water
Chocolate Buttercream
1 1/2 cups unsalted butter, softened
5 cups powdered sugar
1 cup cocoa powder
1/2 cup heavy cream or milk
2 teaspoons vanilla extract
1/2 teaspoon salt
150 grams melted dark chocolate
Green Grass Frosting
1 cup unsalted butter, softened
3 cups powdered sugar
2 to 3 tablespoons milk or cream
1 teaspoon vanilla extract
Pinch of salt
Green gel food coloring
Decorations
Brown, tan, light brown, green, black, white, blue, red, gray, and yellow fondant
Dowels or straws
Cake board
Instructions
- Preheat the oven to 350°F (175°C). Grease and line two 8-inch cake pans and two 6-inch cake pans.
- Whisk flour, sugar, cocoa powder, baking powder, baking soda, and salt in a large bowl.
- In another bowl, whisk buttermilk, oil, eggs, vanilla, and sour cream.
- Add wet ingredients to dry ingredients and mix. Stir in hot coffee or hot water until smooth.
- Divide the batter between the pans and bake until the cakes are set and a toothpick comes out clean.
- Cool completely, then level the tops if needed.
- Make the chocolate buttercream by beating butter, powdered sugar, cocoa, cream, vanilla, salt, and melted chocolate until fluffy.
- Fill and crumb coat the 8-inch tier and the 6-inch tier separately. Chill both.
- Insert dowels into the bottom tier and stack the smaller cake on top.
- Cut brown and tan fondant into small squares and press them around the cake to create pixel dirt-block sides.
- Cover the tops with green frosting or green fondant and pipe grass around the edges.
- Add Minecraft-inspired decorations such as a sword, creeper, sheep, TNT block, and block-style player figure.
- Chill until ready to serve.
Final Thoughts
This chocolate Minecraft cake recipe is a great way to turn a simple homemade cake into a birthday centerpiece that feels playful, recognizable, and custom-made. The moist chocolate cake gives you a rich base, while the block-pattern sides and green grass details instantly create the Minecraft look.
The best part is that this design is much more approachable than it first appears. Because the whole theme is built around squares, cubes, and pixel textures, the decorating process is more forgiving than many other character cakes. Whether you make the full two-tier version or a simpler one-tier cake, the result will feel fun, themed, and memorable.