This beginner Biscoff cheesecake recipe is perfect if you want a dessert that looks elegant but is still simple to make at home. It has a crunchy Biscoff biscuit base, a smooth creamy cheesecake filling, and a sweet cookie butter drizzle on top. Finished with whipped cream, biscuit crumbs, and a Lotus Biscoff cookie, every slice looks like something from a café dessert menu.
The best part is that this is a no-bake cheesecake, so you do not need to worry about water baths, oven cracks, or complicated baking steps. The fridge does most of the work. You mix the base, whip the filling, spread it into the pan, chill it, and decorate it before serving.
This cheesecake is creamy, light, sweet, and full of caramelized biscuit flavor. It is a great recipe for birthdays, holidays, family dinners, weekend desserts, or anyone trying Biscoff cheesecake for the first time.
Why You’ll Love This Beginner Biscoff Cheesecake
This recipe is made for beginners, but the result looks beautiful and professional. The cheesecake has clean layers, a creamy texture, and a rich Biscoff flavor without needing advanced baking skills.
You will love this recipe because it is:
Easy and beginner-friendly
No-bake and oven-free
Creamy, smooth, and rich
Made with simple ingredients
Perfect for making ahead
Great for parties and special occasions
Decorated like a café-style cheesecake slice
The flavor is sweet, buttery, and slightly spiced from the Biscoff cookies. The crumb base gives every bite a little crunch, while the filling stays soft and creamy.
Ingredients
For the Biscoff Biscuit Base
250 g Lotus Biscoff biscuits
90 g unsalted butter, melted
1 tablespoon brown sugar, optional
For the Cheesecake Filling
500 g cream cheese, softened
250 ml heavy cream or double cream, cold
120 g powdered sugar
180 g Biscoff spread or cookie butter
1 teaspoon vanilla extract
1 tablespoon lemon juice, optional
Pinch of salt
For the Topping
120 g Biscoff spread, melted
Whipped cream
Extra Biscoff biscuit crumbs
Lotus Biscoff biscuits
Optional caramel drizzle
Equipment Needed
8-inch springform pan
Mixing bowls
Electric hand mixer or stand mixer
Spatula
Food processor or rolling pin
Parchment paper
Small piping bag, optional
An 8-inch springform pan works best because it makes the cheesecake easy to remove. You can also use a 9-inch pan, but the cheesecake will be slightly thinner.
Ingredient Notes
Biscoff biscuits: These are used for the crust and topping. They give the cheesecake its signature caramelized cookie flavor.
Biscoff spread: This is also called cookie butter. It is mixed into the filling and melted for the top drizzle.
Cream cheese: Use full-fat cream cheese for the best texture. Low-fat cream cheese can make the filling softer and less stable.
Heavy cream: Cold heavy cream helps the cheesecake filling become thick and fluffy.
Powdered sugar: Powdered sugar blends smoothly into the filling without making it grainy.
Vanilla extract: Vanilla makes the filling taste warmer and more balanced.
Lemon juice: This is optional, but a small amount helps balance the sweetness and gives the cheesecake a fresher flavor.
How to Make Beginner Biscoff Cheesecake
Step 1: Prepare the Pan
Line the bottom of an 8-inch springform pan with parchment paper. Lightly grease the sides if needed.
This makes it easier to remove the cheesecake once it has chilled. If you want extra clean sides, you can also line the inside edge of the pan with acetate cake strips.
Step 2: Make the Biscoff Crust
Add the Biscoff biscuits to a food processor and blend until they turn into fine crumbs. If you do not have a food processor, place the biscuits in a sealed bag and crush them with a rolling pin.
Pour the crumbs into a bowl. Add the melted butter and brown sugar if using. Mix until the crumbs look like wet sand.
The mixture should hold together when pressed between your fingers. If it feels too dry, add 1 more tablespoon of melted butter.
Step 3: Press the Base Into the Pan
Transfer the crumb mixture into the prepared springform pan. Press it firmly into an even layer using the bottom of a glass or measuring cup.
Make sure the base is compact. A firmly pressed crust will hold together better when you slice the cheesecake.
Place the pan in the fridge while you make the filling.
Step 4: Beat the Cream Cheese
In a large bowl, beat the softened cream cheese until smooth and creamy. This should take about 1 to 2 minutes.
Make sure the cream cheese is softened before mixing. Cold cream cheese can leave lumps in the filling.
Step 5: Add the Sugar, Vanilla, and Biscoff Spread
Add the powdered sugar, vanilla extract, Biscoff spread, lemon juice if using, and a small pinch of salt. Beat again until everything is smooth and fully combined.
The mixture should look creamy, light brown, and thick.
Step 6: Whip the Cream
In a separate bowl, whip the cold heavy cream until it forms soft to medium peaks. Do not overwhip it. It should be thick but still smooth.
Whipped cream gives the cheesecake a lighter texture and helps it set without baking.
Step 7: Fold the Cream Into the Filling
Add the whipped cream to the cream cheese mixture. Gently fold it in using a spatula.
Do not mix too aggressively. Folding keeps the filling light and smooth.
The finished filling should be thick, creamy, and spreadable.
Step 8: Fill the Cheesecake Pan
Remove the crust from the fridge. Spoon the cheesecake filling over the base and smooth the top with a spatula.
Tap the pan gently on the counter to remove air pockets.
Cover the pan and refrigerate for at least 6 hours, but overnight is best.
Step 9: Add the Biscoff Topping
Once the cheesecake is fully set, melt the Biscoff spread in the microwave for about 15 to 25 seconds until it becomes pourable.
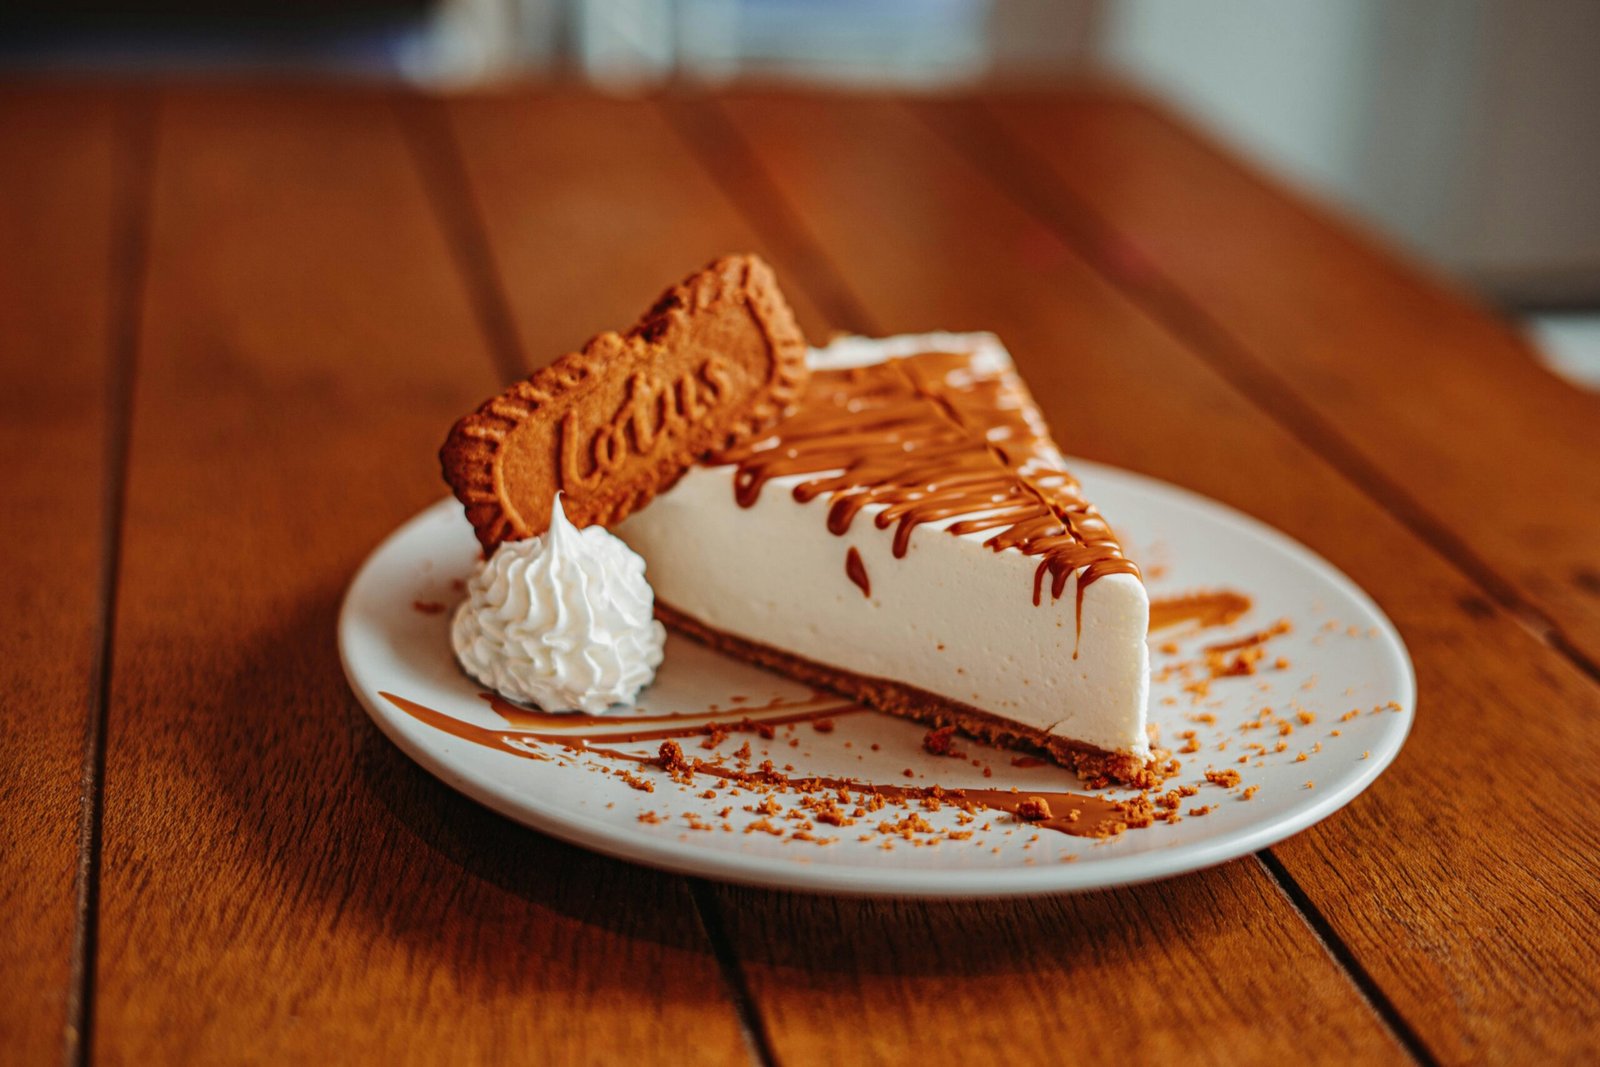
Let it cool slightly, then pour it over the top of the cheesecake. Spread it gently into an even layer or drizzle it in lines for a café-style look like the image.
Place the cheesecake back in the fridge for 15 to 20 minutes so the topping can set slightly.
Step 10: Decorate and Serve
Remove the cheesecake from the springform pan. Pipe whipped cream on top or beside each slice. Add biscuit crumbs and place a Lotus Biscoff cookie on top for decoration.
For a slice that looks like the image, serve it on a white plate with a drizzle of melted Biscoff spread across the cheesecake and plate. Add a small whipped cream swirl and one Biscoff biscuit leaning against the slice.
How to Make It Look Like the Picture
The cheesecake in the image is smooth, clean, and simple. To recreate that look, focus on clean layers and neat decoration.
Use a firm biscuit base and press it flat so the bottom layer looks even. Smooth the cheesecake filling carefully before chilling. When slicing, use a sharp knife dipped in hot water, then wipe the knife clean between each cut.
For the topping, melt Biscoff spread until it is pourable, then drizzle thin lines across the slice. Add a small whipped cream swirl, a sprinkle of crumbs, and one Lotus biscuit. This gives the cheesecake a restaurant-style finish without needing complicated decorating skills.
Tips for the Best No-Bake Biscoff Cheesecake
Use full-fat cream cheese for a firm and creamy filling.
Chill the cheesecake overnight for the cleanest slices.
Do not overwhip the cream, or the filling may become grainy.
Press the crust firmly so it does not crumble.
Use powdered sugar instead of granulated sugar for a smoother filling.
Warm the Biscoff spread slightly before drizzling.
Use a hot knife for neat slices.
Decorate right before serving so the biscuit topping stays crisp.
Common Mistakes to Avoid
The cheesecake did not set
This usually happens if the cream was not whipped enough, the cheesecake did not chill long enough, or low-fat cream cheese was used. Chill the cheesecake overnight for the best result.
The filling has lumps
The cream cheese was probably too cold. Let it soften at room temperature before mixing.
The base is falling apart
The crust may need more butter or firmer pressing. The crumbs should feel like wet sand before pressing into the pan.
The topping is too thick
Warm the Biscoff spread for a few seconds until it becomes smooth and pourable.
The slices are messy
Use a hot knife and wipe it clean after each slice. The cheesecake should also be fully chilled before cutting.
Recipe Variations
Mini Biscoff Cheesecakes
Make the recipe in a muffin tin lined with cupcake liners. Add a spoonful of crust to each liner, top with filling, and chill until set. These are perfect for parties.
Biscoff Cheesecake Cups
Layer biscuit crumbs, cheesecake filling, and melted Biscoff spread in small glasses. This is a great no-slice dessert idea.
Chocolate Biscoff Cheesecake
Add 100 g melted chocolate to the filling for a chocolate cookie butter version.
Caramel Biscoff Cheesecake
Drizzle caramel sauce over the top along with melted Biscoff spread for an extra sweet dessert.
White Chocolate Biscoff Cheesecake
Fold 100 g melted white chocolate into the filling. This makes the cheesecake sweeter and richer.
What to Serve With Biscoff Cheesecake
This cheesecake is rich and creamy, so it pairs well with simple drinks and light toppings. Serve it with coffee, espresso, cappuccino, iced coffee, black tea, or cold milk.
For toppings, try whipped cream, crushed biscuits, caramel sauce, vanilla ice cream, fresh strawberries, or a dusting of cinnamon.
It is also a great dessert for a party table with brownies, cookies, fruit cups, or mini pastries.
How to Store Biscoff Cheesecake
Store the cheesecake covered in the fridge for up to 4 days. Keep it in the springform pan or transfer slices to an airtight container.
If you decorate with whole Biscoff biscuits, add them close to serving time. The biscuits can soften in the fridge if they sit too long on the cheesecake.
Can You Freeze Biscoff Cheesecake?
Yes. This cheesecake freezes well without the whipped cream decoration.
To freeze, chill the cheesecake until firm, then wrap it tightly in plastic wrap and foil. Freeze for up to 2 months.
To serve, thaw overnight in the fridge. Add fresh whipped cream, biscuit crumbs, and Biscoff drizzle after thawing.
Make-Ahead Instructions
This is a perfect make-ahead dessert. You can prepare the cheesecake one day before serving and let it chill overnight.
For the best presentation, add the final decoration on the day you serve it. The cheesecake itself can be fully made ahead, but the whipped cream and biscuit topping look freshest when added last.
Frequently Asked Questions
Is Biscoff cheesecake beginner-friendly?
Yes. This recipe is very beginner-friendly because it is no-bake and does not require special baking techniques.
Can I make this cheesecake without a springform pan?
Yes. You can make it in a deep dish, square pan, or individual cups. A springform pan just makes it easier to remove and display.
Can I use digestive biscuits instead of Biscoff biscuits?
Yes, but the flavor will be less strong. For the best Biscoff flavor, use Biscoff biscuits in the base.
Can I use whipped topping instead of heavy cream?
Yes, but heavy cream gives a better homemade texture. If using whipped topping, fold it gently into the cream cheese mixture.
How long does no-bake cheesecake need to chill?
At least 6 hours, but overnight gives the best texture and cleanest slices.
Can I make this cheesecake less sweet?
Yes. Reduce the powdered sugar slightly and add 1 tablespoon of lemon juice to balance the sweetness.
Can I add gelatin?
You can add gelatin if you want a very firm cheesecake, but this recipe is designed to set without it when properly chilled.
Recipe Card
Beginner Biscoff Cheesecake
Prep Time: 25 minutes
Chill Time: 6 hours
Total Time: 6 hours 25 minutes
Servings: 10 slices
Category: Dessert
Method: No-Bake
Cuisine: American / European-Inspired
Ingredients
For the Base
250 g Lotus Biscoff biscuits
90 g unsalted butter, melted
1 tablespoon brown sugar, optional
For the Filling
500 g cream cheese, softened
250 ml heavy cream or double cream, cold
120 g powdered sugar
180 g Biscoff spread
1 teaspoon vanilla extract
1 tablespoon lemon juice, optional
Pinch of salt
For the Topping
120 g Biscoff spread, melted
Whipped cream
Biscoff biscuit crumbs
Lotus Biscoff biscuits
Instructions
- Line the bottom of an 8-inch springform pan with parchment paper.
- Crush the Biscoff biscuits into fine crumbs.
- Mix the crumbs with melted butter until they resemble wet sand.
- Press the mixture firmly into the bottom of the pan. Chill while making the filling.
- Beat softened cream cheese until smooth.
- Add powdered sugar, Biscoff spread, vanilla, lemon juice if using, and salt. Mix until creamy.
- In a separate bowl, whip the cold heavy cream until soft to medium peaks form.
- Gently fold the whipped cream into the cream cheese mixture.
- Spread the filling over the chilled crust and smooth the top.
- Refrigerate for at least 6 hours or overnight.
- Melt the Biscoff spread and drizzle or spread it over the cheesecake.
- Chill for another 15 to 20 minutes.
- Decorate with whipped cream, biscuit crumbs, and Lotus biscuits before serving.
Final Thoughts
This beginner Biscoff cheesecake recipe is simple, creamy, and perfect for anyone who wants a beautiful homemade dessert without baking. The crunchy biscuit base, smooth cookie butter filling, and sweet Biscoff drizzle make every slice rich and delicious.
It is easy enough for a first cheesecake but impressive enough for a birthday, holiday, or dinner party. Serve it chilled with whipped cream and a Lotus biscuit on top for the perfect café-style finish.