Mack O'reilly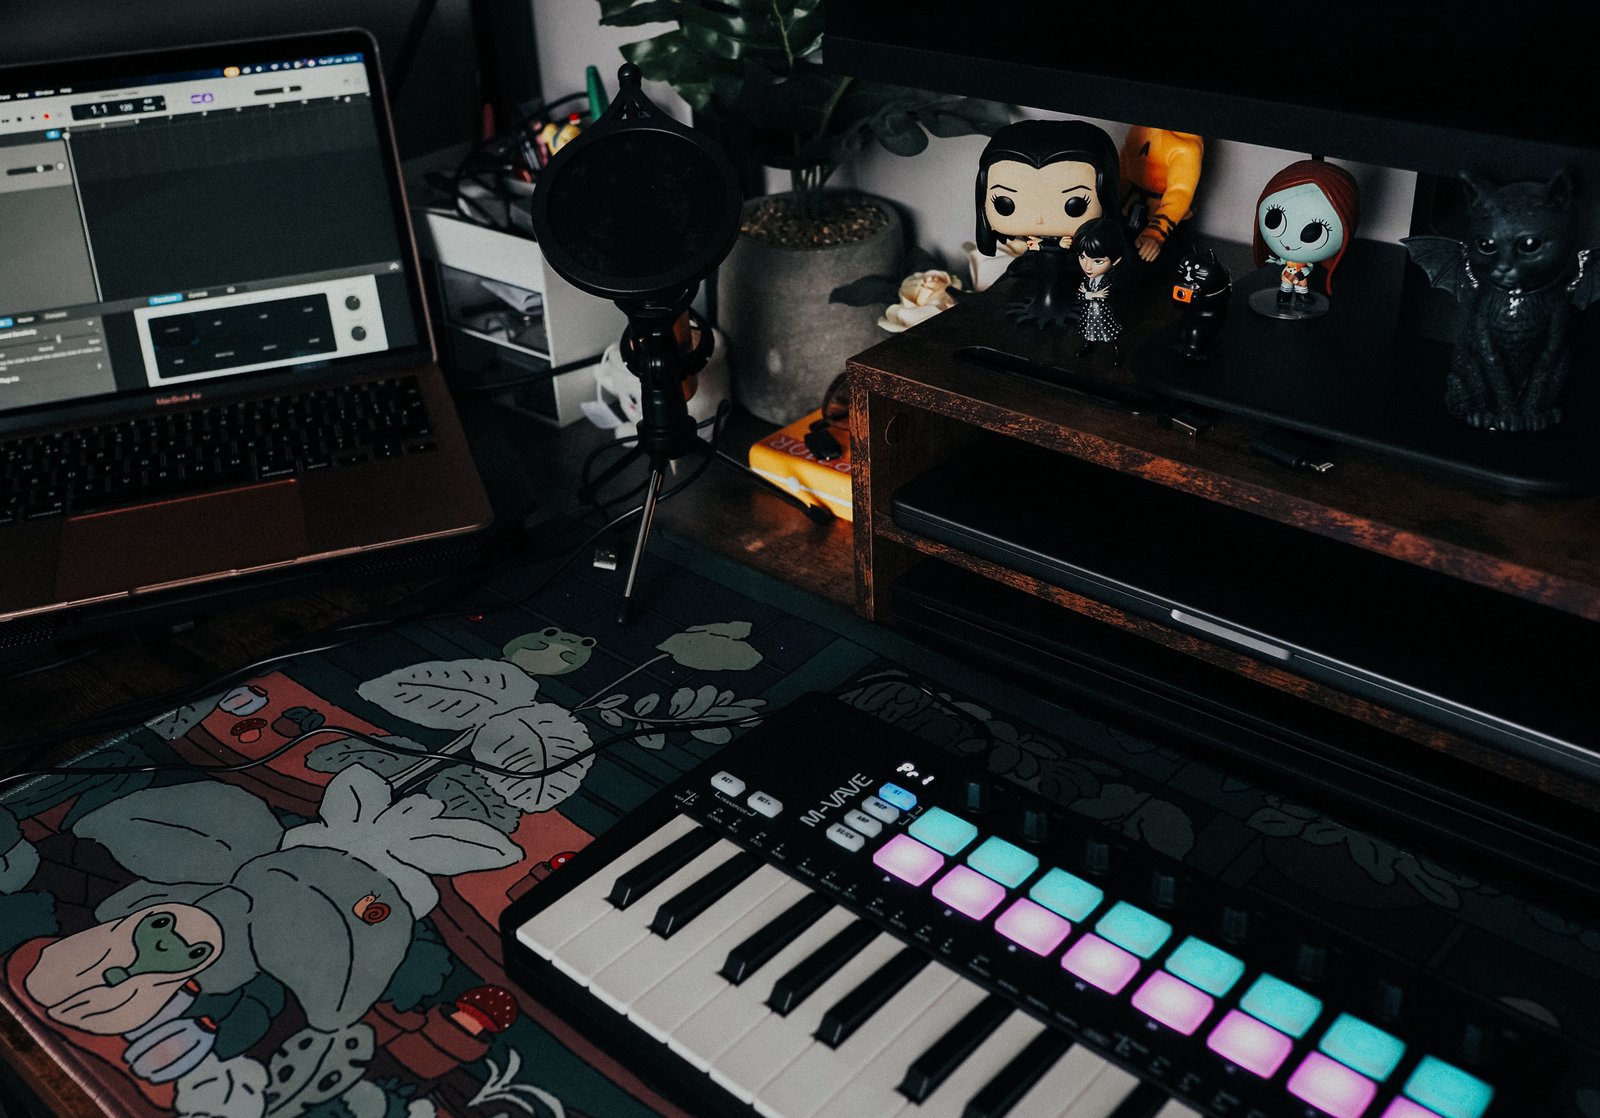
A capable home studio does not need to fill an entire room. With a well-organized desk and carefully selected accessories, a compact setup can support recording, music production, podcasting, voiceovers, and content creation.
The featured workspace demonstrates this approach. A laptop runs the recording software, while a small MIDI controller provides hands-on musical input. Meanwhile, a microphone and pop filter create a dedicated vocal area without occupying much space. A raised shelf adds another level for equipment and personal décor, allowing the main desktop to remain usable.
The key is not owning the largest collection of studio gear. Instead, every accessory should improve recording quality, simplify the workflow, or make longer sessions more comfortable.
Start With the Core Signal Chain
Before adding accessories, understand how sound moves through the setup. A simple recording chain usually follows this path:
Microphone or instrument → audio interface → computer → recording software → headphones or studio monitors
Each accessory should support one part of that chain. Therefore, buying random studio products before establishing the basic workflow often leads to clutter and unnecessary spending.
For a compact beginner setup, the core equipment may include:
- Computer or laptop
- Recording software
- Audio interface
- Microphone
- Headphones
- Appropriate cables
- Microphone stand
- Pop filter
A MIDI controller can then be added for composing melodies, programming drums, controlling virtual instruments, and adjusting software functions.
Choose a Microphone for the Intended Work
The microphone is one of the most visible accessories in the featured setup. It sits on a compact desktop stand and includes a circular pop filter, creating a small recording zone beside the laptop.
Different microphones suit different rooms and recording situations. Condenser microphones often capture greater detail, although they can also pick up more room sound. Dynamic microphones may reject more background noise and can work well in untreated bedrooms or shared spaces.
Rather than choosing a microphone only because it is popular, consider:
- What will be recorded
- How quiet the room is
- How close the user will be to the microphone
- Whether the microphone requires an audio interface
- Available desk space
- The type of stand required
- The connection type
USB microphones connect directly to a computer and provide a simple starting point. However, XLR microphones work with an audio interface, which generally creates a more flexible studio system because microphones and other components can be upgraded independently.
Add a Pop Filter
A pop filter sits between the performer and the microphone. It helps reduce the strong bursts of air created by certain consonant sounds, which can otherwise cause distracting low-frequency impacts in a recording.
The featured setup uses a circular filter positioned directly in front of the microphone. This arrangement also acts as a simple distance guide because the user naturally remains behind the filter.
For effective placement, leave some space between the microphone and filter rather than pressing them together. Then, record a short test and adjust the angle until the voice sounds clear without unwanted air hitting the capsule.
Foam windscreens provide another layer of protection and can reduce light air movement. Nevertheless, a pop filter usually offers more control for close vocal recording.
Select the Right Microphone Stand
A microphone stand should hold the microphone steadily while allowing comfortable positioning. Vibrations from typing, touching the desk, or moving equipment can travel through a lightweight stand and enter the recording.
Several stand types are available:
Desktop Tripod
A desktop tripod is compact and easy to move. It works well in small spaces, although it may transfer desk vibrations more readily than a separate floor stand.
Low-Profile Boom Arm
A low-profile arm runs close to the desk and keeps the area above the monitor clear. It suits modern setups where the microphone needs to move between recording and storage positions.
Traditional Boom Arm
A standard spring-loaded arm provides a wide range of movement. In addition, it can position the microphone close to the user without requiring a large stand base.
Floor Stand
A floor stand separates the microphone from desk vibration. However, it needs more room and may be less convenient in a compact bedroom studio.
Whichever design is selected, confirm that it can support the microphone’s weight. A shock mount can provide additional isolation by reducing vibrations transmitted through the stand.
Use a MIDI Controller to Improve the Workflow
The small keyboard in the featured setup combines piano-style keys with illuminated pads and control knobs. This type of MIDI controller does not usually produce sound by itself. Instead, it sends performance information to virtual instruments and recording software.
Even a compact controller can make production more intuitive. Keys can play melodies and chords, while pads can trigger drums, samples, or software commands. Knobs may control volume, filters, effects, or automation.
Choose a controller based on the available space and production style:
- Mini keyboards suit compact desks and portable setups.
- Larger keyboards provide more comfortable two-handed playing.
- Pad-focused controllers work well for beats and samples.
- Controllers with knobs and faders offer more software control.
- Models with transport buttons simplify recording and playback.
Position the controller close enough to use without moving other equipment. If it is only required occasionally, store it on a pull-out tray or vertical stand.
Include an Audio Interface
An audio interface converts microphone or instrument signals into a format the computer can record. It also sends audio from the computer to headphones or speakers.
A simple interface with one or two inputs is sufficient for many bedroom studios. However, musicians who plan to record several microphones or instruments simultaneously may need additional inputs.
Important features include:
- The correct number of microphone and instrument inputs
- Headphone output with independent volume control
- Support for condenser microphones when required
- Direct monitoring
- Compatible computer connection
- Suitable outputs for studio monitors
- Stable drivers and software support
Place the interface where its gain controls and headphone connection remain accessible. Hiding it behind a monitor may create a cleaner desk, but it can slow down routine adjustments.
Decide Between Headphones and Studio Monitors
Headphones are usually the easiest monitoring option in a small or untreated room. They allow recording and editing without disturbing other people, and they prevent speaker sound from entering an active microphone.
Closed-back headphones are useful while recording because they reduce sound leakage. In contrast, open-back headphones can provide a more spacious listening experience for editing and mixing, although they allow sound to escape.
Studio monitors can make longer production sessions feel more natural. Nevertheless, their performance depends heavily on placement and room acoustics.
If monitors are added, position them symmetrically and aim them toward the listening position. Stands or isolation pads can help place the speakers at a suitable height while reducing vibrations through the desk.
Organize the Computer and Display
The featured setup uses a laptop for recording software and a larger display above the desk. This provides additional screen space for timelines, plugins, virtual instruments, and file organization.
A monitor shelf raises the display while creating storage beneath it. Consequently, equipment can occupy several vertical levels without reducing the main working area.
For a comfortable arrangement:
- Center the primary screen in front of the chair.
- Keep frequently adjusted equipment within reach.
- Raise the display to a comfortable viewing height.
- Avoid placing the microphone directly in front of the screen.
- Leave ventilation space around the laptop.
- Use a stand if the laptop serves as a secondary display.
An external keyboard and mouse may improve comfort when the laptop remains raised for long periods.
Use a Large Desk Mat
A large desk mat, like the illustrated design in the featured workspace, can visually unite the setup. It also protects the desktop, provides a smooth mouse surface, and reduces minor noise from placing accessories on hard wood.
Choose a size that leaves room for the keyboard, mouse, MIDI controller, and smaller accessories. However, keep ventilation openings and equipment feet uncovered when necessary.
A darker desk mat can also create contrast beneath white or illuminated equipment. Meanwhile, a patterned design introduces personality without requiring additional objects on the desk.
Plan Cable Management
Audio equipment creates several different cable types, including power, USB, microphone, headphone, and speaker cables. Without a plan, those cables can quickly cover the desk and complicate troubleshooting.
Begin by separating power cables from sensitive audio cables where practical. Then, route each group along a clear path using reusable ties, clips, or an under-desk tray.
A useful system may include:
- Labels at both ends of important cables
- An under-desk power strip
- Short USB cables for nearby devices
- Cable clips behind the monitor shelf
- A sleeve for cables running toward the floor
- Spare cables stored in labeled containers
- Velcro ties instead of permanent plastic ties
Leave enough slack for microphone arms and adjustable equipment to move safely. At the same time, avoid large loose loops around the user’s feet.
Improve the Room Before Buying More Equipment
Room sound has a major effect on vocal and instrument recordings. Hard, empty surfaces reflect sound, which can create noticeable echo or make recordings feel distant.
Before purchasing expensive acoustic products, improve the room with existing furnishings. Curtains, rugs, bookshelves, upholstered furniture, and bedding can reduce some reflections.
For further control, acoustic panels can be placed at important reflection points. Bass traps may help in corners, while a thick panel behind the recording position can reduce sound returning toward the microphone.
Decorative foam alone will not fully soundproof a room. Sound treatment improves the way audio behaves inside the room, while soundproofing requires changes to the room’s structure. The two goals should not be confused.
Add Accessories in Order of Importance
A compact studio becomes easier to build when purchases follow a clear priority.
Start with the equipment needed to record and hear audio. Afterward, add accessories that solve specific problems.
A practical order is:
- Computer and recording software
- Audio interface
- Microphone
- Headphones
- Microphone stand and pop filter
- Required cables
- MIDI controller
- Monitor speakers
- Acoustic treatment
- Additional control surfaces or decorative lighting
This order may change according to the type of work. For example, an instrumental producer may prioritize a MIDI controller, while a voiceover creator will benefit more from a microphone, stand, and room treatment.
Personalize Without Crowding the Desk
The featured setup includes plants, books, and character figures around the monitor shelf. These objects make the studio feel personal; however, most of them remain above or behind the main working area.
That placement is effective because it protects the space needed for recording. A few carefully chosen objects can make a studio inspiring, while excessive decoration may interfere with equipment and collect dust around cables.
Use shelves, risers, and wall storage to keep personal items visible without placing them beside microphone controls or audio connections.
Final Thoughts
A strong studio audio accessories setup begins with a clear signal chain and a specific creative purpose. The microphone, stand, pop filter, interface, headphones, MIDI controller, and computer should work together rather than compete for desk space.
The featured setup succeeds because it uses vertical storage, compact equipment, and a defined recording area. Moreover, its desk mat, plants, figures, and warm wooden surfaces give the workspace personality without reducing its function.
By purchasing accessories in a logical order and organizing cables from the beginning, even a small desk can become a practical home studio for recording, production, and creative work.